Let’s Talk Oatmeal (hint: it’s all about the texture)

Okay so it is really cold outside so something hot is usually what people want first thing but no one wants (read: no one in their right mind) a huge bowl of mush. Sure, oatmeal is super healthy and a go to for so many for that very reason but it doesn’t have to be an unpleasant experience in any way. Let’s talk about what’s important…

The Basics

A good foundation is the most important.

Steel Cut vs. Anything Else? Steel Cut All The Way

Since they are one of the healthiest grains you can eat , start your day right and there is zero reason to choose anything else; they are third only to Oat Groat and Oat Bran. They are only steamed and toasted so the processing is minimal and you get the full benefit of the grain.

Build the Foundation

All you need to start a good oatmeal is Steel Cut Oatmeal, Brown Sugar and Milk; everything else is optional and based on your preference (I have included walnuts in my photo above because they are a non-negotiable for me). I would highly recommend adding salt, vanilla and cinnamon at a minimum to ensure a complete rounding of flavor.

Note: when I say “salt”, assume I am referring to sea salt unless I indicate otherwise. Always.

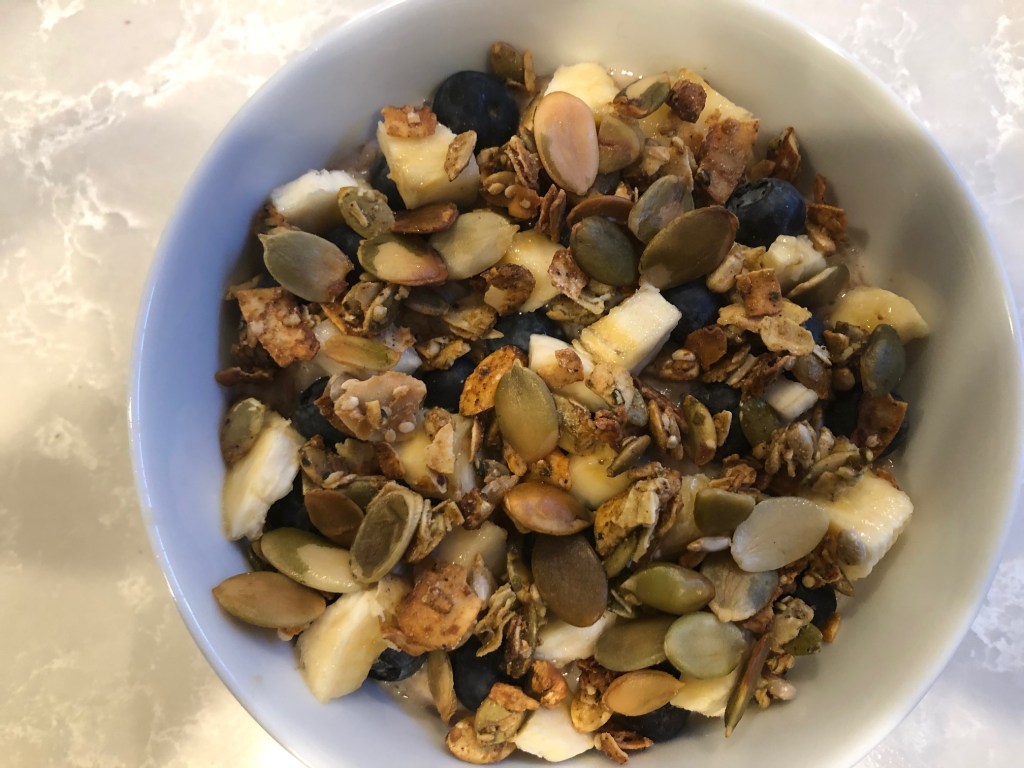
This morning I made for Chris Banana Walnut Oatmeal Topped with Fresh Blueberries and Bananas, Paleo Granola and Roasted Pumpkin Seeds so I based this blog on that but your options are endless; I almost never make the same oatmeal twice. Use what you have in your cabinet, you really can’t go wrong.

It takes almost no time for the oatmeal to cook (~20 minutes) so I throw everything in at the beginning. For a single bowl of oatmeal, I start with one half cup of oats and cover with milk (you will continue to add as it cooks to your desired consistency) then sprinkle in a pinch of salt and cinnamon, a tablespoon of brown sugar and a dash of vanilla. Turn to medium heat until it starts to boil, stirring frequently; careful as it can dry and burn to the pan easily. Dice half of a banana and crumble some walnuts, toss them in now also, this leads to a mixture texture within the oatmeal itself.

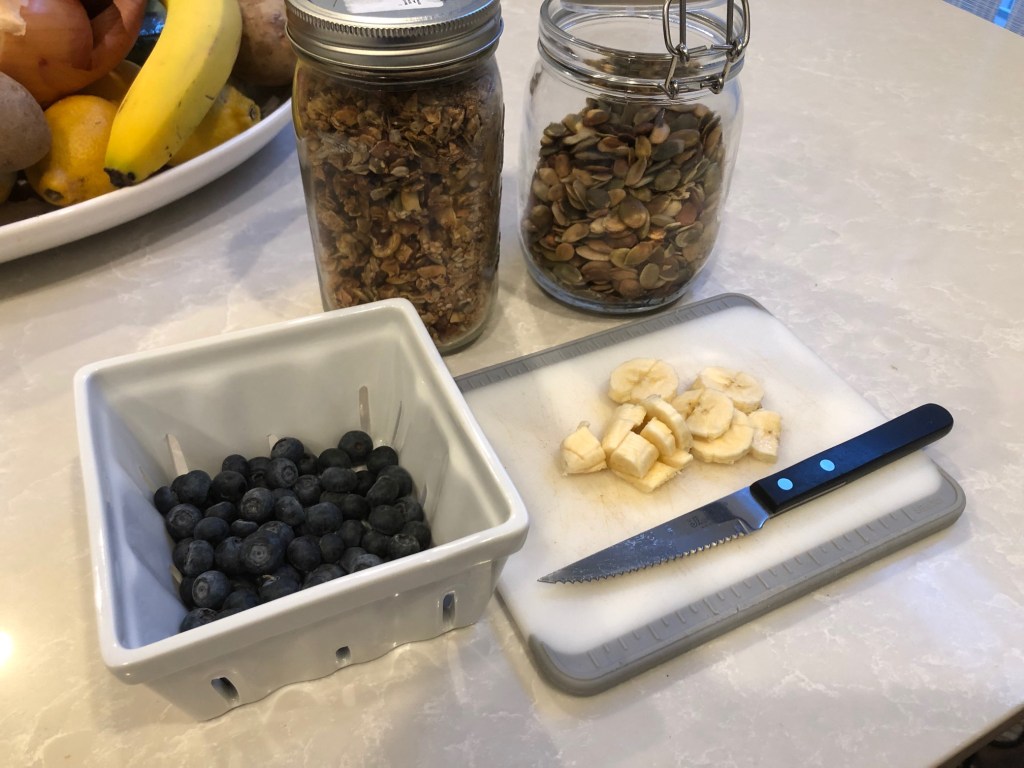
While the oatmeal cooks, start gathering the toppings. I diced the other half of the banana, grabbed the last of the blueberries, some paleo granola and roasted pumpkin seeds. Whole Foods has an amazing paleo granola with coconut if you don’t want to make it and pumpkin seeds are great to buy in bulk as they don’t really “spoil”.

The secret to a really nicely constructed oatmeal is equal distribution of the texture so I put the same thing on the bottom of the bowl before I spoon the oatmeal as I put on the top*! Sprinkle some granola on the bottom, spread the fruit evenly across the bottom and add some pumpkin seeds, spoon in the oatmeal and top with the same thing as the bottom.

Tip: This is the same for yogurt also, blog about that coming soon…..

The photos and food you see I make on this blog are things I would make and do on any day, not just for the blog. It’s important you know I obsess about how things look since you eat with your eyes first. Don’t do it to the degree I do (you will make yourself crazy) but I do think presentation is important (IMO).

Following is a photo of the finished product and I always have these cups on hand for to-go coffee and yogurt/oatmeal on the go; keep everything the temperature you desire for a while. I highly recommend them. Hope you enjoy……

Banana Walnut Steel Cut Oats Topped with Fresh Bananas and Blueberries, Paleo Granola and Roasted Pumpkin Seeds.

French Toast can be Magical

I assume everyone likes french toast, I would like for everyone to love french toast…

As the foundation of the meal, bread is the single most important ingredient so choose it wisely; the good thing is, you can (read: should) use stale bread. The French call it “pain perdu” which literally means “lost bread” so you kind of have to respect it’s origin. The bread needs to be hearty and thick like one of those giant loaves of sourdough you get at Whole Foods and can never finish before it molds unless you are using it to panel a wall. Look for tips on how to use the portions of bread you don’t use in my tips and tricks section here.

First you need to make the custard and, forgive me, I am not an exact science person unless I am baking (where it is required for me because I am not that experienced) so there are rough estimates here. I think, traditionally, there should be two eggs for every person you are serving and let’s assume there are six people for this recipe so we can use up the eggs and have leftovers! This should make 12 slices of french toast.

Make the Custard (the wet stuff)

Break 12 eggs into a bowl [Note: don’t break the eggs on the edge of the bowl, always on the counter so you don’t splinter the shell] and add some milk, maybe one and a half cups; for a richer and “less egg-y” taste, use the whites of only 6 or 8 of the eggs and increase the milk by 1/4 of a cup. Several things make french toast great like vanilla, cloves, nutmeg, cinnamon, maple syrup and even pumpkin pie spice mix in the fall so add in smaller doses. I always add vanilla and cinnamon because it is a good foundation for the custard but it’s your meal so add what you like/feel like. Smell is a good barometer to taste so start with small doses until you feel it is just right.

Spice Note: Careful with powerful spices like cloves and nutmeg because you can really ruin a dish with too much. The same with the syrup but that’s for a different reason, you can dilute the custard too much; I always err on the side of caution using the syrup.

Prepare the Bread

One of the most important characteristics of french toast (to me) is the “crust” on the completed dish so I like to prepare the bread before the custard and butter…. butter makes everything better!

I am assuming the bread is thickly sliced so we will go right to the prep, slather that bread with some softened butter but don’t overdo it because no one likes soggy French Toast. Put it on both sides so there is a consistent crust.

[Note: I always have a stick of butter on the kitchen counter just in case]

Start the Soak

Place the buttered bread in a 9×13 baking dish and pour the custard over the bread.

Custard Sidebar: Unfortunately it isn’t that simple, I routinely don’t have enough custard so don’t take it personally if you don’t. I just break some more eggs and use the reduced ration to keep it consistent then pour it over until the bread is covered.

The soaking time is important, you want the bread to really absorb the custard, the amount of custard you need and the soaking time is relative to the type of bread you are using. Pour until it is just covered almost to the top and turn halfway through the soaking time so you don’t get it too saturated.

Bread Note: If you are using regular white bread just throw it in the garbage and eat a banana, it isn’t even worth the calories.

You can soak for as little as 10 minutes or even overnight, it is directly related to how easy you need your morning breakfast to be.

Post Soak Cooking

There are two very acceptable methods of cooking french toast: baking and “frying” (in a skillet). They each have merits and it can be a heated debate, treat it like politics and don’t discuss your preferred method. Regardless of the method, sprinkle both sides with cinnamon and sugar before you start so it can caramelize during the cooking process.

If you are baking it you can either move the bread to a baking sheet or, if all of the custard is absorbed, just pop the baking dish into a 350 degree oven for ~30-45 minutes (again depending on the thickness of your bread); this results in a less crunchy version but it is still good. I turn the slices over about halfway through to try to get equal “bread to pan” action.

If you are cooking in a skillet, heat it first. You want the shock of the hot pan against the butter/sugar but don’t let it get too hot, use your best judgement. Place the bread in the pan and let it sit until the crust forms, it is important the heat is high enough to cook all the way through and low enough not to scorch the outside before the inside is done; I like to use a rule of 5-7 minutes per side but you can probably do it quicker if you’re in a time crunch. Seriously, the entire subject of French Toast is subjective to me so make it your own.

Top that Stuff!

Okay so this is where it really takes a turn to the independent. You can top french toast with almost anything and presentation is important so slice it on the diagonal before you top it and serve it straight away so it doesn’t get soggy.

Following are some of the options I like to add and it is never just one (Chris’ fave combo of mine is berries, granola, honey, powdered sugar and yogurt):

  • Crumbled Cooked Bacon
  • Crumbled Cooked Sausage
  • Granola (thoughts on granola and my recipe coming soon)
  • Nuts (I always have toasted nuts on hand but you can toast them while it cooks too)
  • Yogurt
  • Honey
  • Fruit (any kind but berries, bananas and stone fruits are the best; I always use fresh)
  • Pomegranate Seeds!!!
  • Powdered Sugar
  • Syrup (recipe coming soon)
  • Roasted squash, sweet potato or pumpkin (for a more savory brunch option)

I hope you enjoy this much as he does…..

My breakfast sandwich secret….

Those who know me at all, you know I cook breakfast for Chris every morning; sometimes he needs to run out the door. I try to make sure I don’t make his first meal of the day mundane so I like to shake it up and find different ways to prepare the things he loves. A breakfast sandwich is something he has found to be particularly enjoyable.

Okay so perfect is subjective but my idea of the perfect sandwich is bread, egg, protein and cheese but those are just my preference; the perfect sandwich is a concept. The bread and protein options are almost endless but it is how you make the sandwich that is the key, the actual construction if it.

First, toasting the bread is a must so get that out of the way while you prepare the rest; just make sure you don’t over-toast (the last thing you need is for that bread to break and send your goodness tumbling onto your lap).

The protein is important (and this can be meat or even vegetables, a combination of both) so for this example I will use sausage. Break the raw sausage up in the pan and cook until no longer pink and a little charred on the outside, set aside and move on to the eggs.

Do not scramble the eggs, I repeat, do not scramble the eggs. Who wants those little bits of egg falling out all over the place. Seriously, people who make these sandwiches for on-the-go and eat them in the car are waiting for a rat infestation under the seats. Just break the egg into a non-stick pan with a little butter and “break-up” the yolk so it disperses into the white of the egg and let it set making sure you guide the egg into a size similar to the bread you are using; you can do this by pushing the sides onto itself (for english muffins) or away from itself (for sourdough or bagels). Once set, turn over and push to the side of the skillet and grab the cheese.

Make a “nest” with the cheese directly on the surface of the skillet and place the sausage on top of the cheese; the cheese will melt and hug those delicious little nuggets and never let them go. As the egg finishes, the cheese caramelizes and the deliciousness is ready to come together. Place the egg on the bread and top with the cheese then wrap in foil.

The purpose of the foil for me is two-fold: it keeps it warm and it also steams the bread a little to give you that toasted crunch with a little tenderness on the outside. Texture is a huge part of an elevated eating experience. The foil isn’t necessary but it sure does take it to the next level for a home cook like me.

Enjoy!